Download the Postman config files
We understand that digesting all of the information required to use the PayMe API can be very time-consuming. To speed things up, below are some configuration files for your use on Postman - a third-party API development environment.
Click to download each file (collection.json, environment.json), then add your sandbox credentials (client_id, client_secret, signing_key_id, signing_key) to the environment to begin your API call tests.
API version
API Collection
Environment configurations
Version 0.12
Download Download
Version 0.11
Deprecated
Deprecated
Version 0.10
Deprecated
Deprecated
Please visit Postman's Learning Center for details on how to manage environments and collections in JSON.
In order to retrieve your API credentials to use Postman, please follow the steps outlined in Signup .
Swagger API
Swagger spec describes all the operations that PayMe API supports with response structure. Click here to download API Specification.
Get Access Token
This API is used for obtaining the access token used as part of the request headers to invoke the Payment APIs.
Your assigned client_id and client_secret are passed in the request body in a URL encoded format. Upon successful authentication of the client_id and client_secret, the access token will be sent in the response.
Please note that it is not necessary to validate the access token you obtained from the response, as the implementation (e.g. token issuer and identity provider) may change over time. Validation may break your API call flow in future.
The access token represents your identity and the permissions you have when calling the APIs.
Token lifecycle
The access token you receive after authorisation is expected to be used for all API calls until it expires.
You should not request a new token for each API request.
The token will expire 60 minutes after it was generated. Once expired, a new token must be requested from the token API and used in subsequent Payments API requests.
Calling the endpoint
The token API docs can be found here.
Use the postman collection to test generating an access token. The body of the request must be URL encoded, and follow the format shown below:
client_id={{client_id}}&client_secret={{client_secret}}
Note : make sure to URL encode your client and secret before sending the values.
Creating a payment request
This API is used for creating a new payment request.
The response will contain a URI that can be used to generate a PayCode or a deep link into the PayMe application. The customer will scan the PayCode using the PayMe application to retrieve payment details and then authorise the payment.
Alternatively, if the customer is using a mobile checkout, they will be presented with the deep link, which will open the PayMe application on their phone to retrieve the payment details and authorise payment.
Adding your business logo into your PayCode
To improve the connection with your customers and to provide your customers comfort they are paying your business, PayMe enables you to create a custom PayCode with your business logo in. This unique PayCode should be presented to your customers when they wish to make a payment on your website.
The business logo is provided to PayMe during merchant on-boarding when you register your account. In our example, the business logo for PayMe Cafe is added as shown below:
Your business logo will be returned to you in the payment request response body. PayMe returns the images of the logos in 5 different sizes: tiny (40x40 pixels), small (60x60 pixels), normal (300x300 pixels), large (600x600 pixels) and full.
This is helpful for displaying the PayCode on different devices.
The following code comes from the body of CreatePaymentRequest and it shows that there are five sizes implemented for the merchant business logo:
"businessLogos":
{
Our Sandbox only returns the PayMe logo to the merchant, not the merchant's business logo. The following picture shows the PayMe logo located in the middle of the PayCode that is returned by Sandbox to the merchant.
In production, merchants should populate their business logos to the PayCodes they generate and present them to customers for scanning. The following example shows the merchant business logo for PayMe Cafe located in the middle of the PayCode. You should replace this with your own business logo returned to you in the payment request response (as described above).
Calling the endpoint
The payment API docs can be found here.
Use the postman collection to test creating a payment request.
Optional metadata
The "merchantData" object is optional and intended to allow merchants to supply extra metadata about a purchase.
Click here for examples
An example:
{
An order detail example:
{
Cancel Payment Request
This API is used for cancelling a payment request.
A payment request is created when a consumer selects PayMe at checkout option. As a response to this payment request a PayCode is generated and sent. This PayCode is shown to the consumer so that they can complete the payment. If the consumer decides to exit their current checkout session then you can use this API to cancel the payment request. Once a payment request is cancelled then the consumer will be unable to pay the corresponding PayCode.
This will change the status of the payment request to PR004: Aborted
Calling the endpoint
The payment API docs can be found here.
Use the postman collection to test cancelling a payment request.
Webhooks
Overview
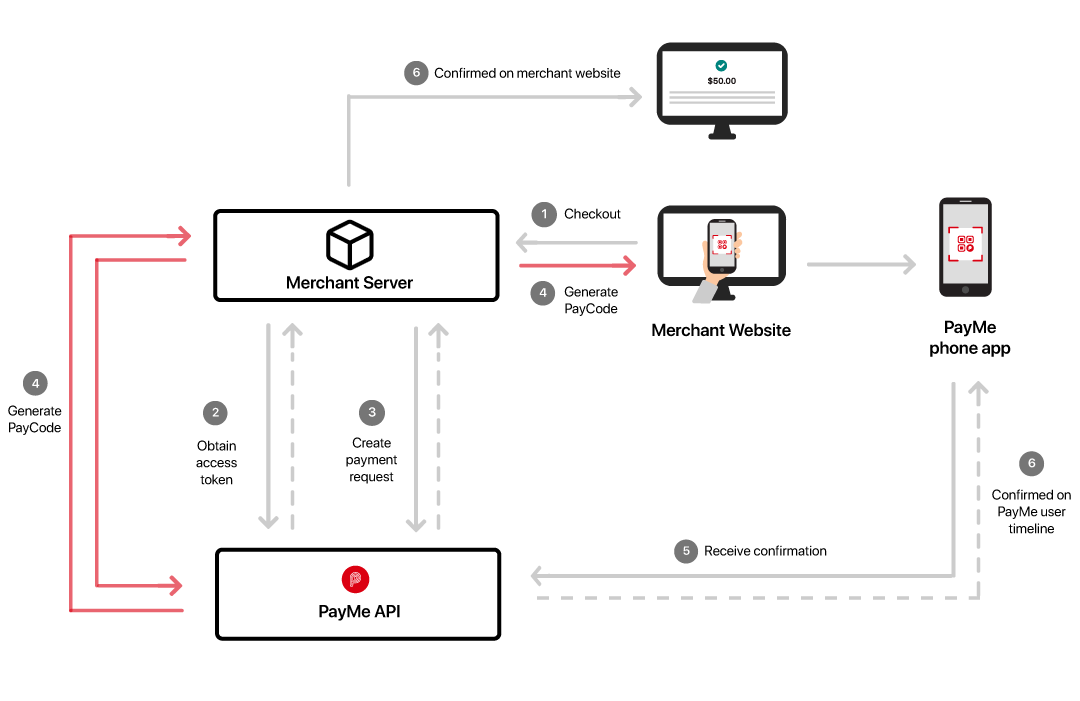
Webhooks are HTTP callbacks that provide your applications with a way to receive notifications from an endpoint. The PayMe APIs use webhooks for payment notifications. To receive notifications, you need to configure a webhook listener, i.e. a server that listens at a specific URL for incoming HTTP POST notification messages. Whenever a payment occurs, PayMe will post the payment notification data to your specified URL, thus updating your application in near real-time. The following diagram illustrates how webhook works:
Setting up webhooks
To set up a webhook you need to configure a RESTful service on your server for receiving notifications. Please follow the steps below:
1. Configure the webhook notification URL and send it as part of the Payment Request API so that PayMe knows where to POST notifications to.
2. Verify that your endpoint is valid, and acknowledge your endpoint is receiving notifications successfully. You need to send a HTTP status code 200 response to the PayMe API every time you receive the webhook notification.
3. Ensure that the code to handle the notification response adheres to the webhook API specifications. Click here to download the swagger specifications.
NOTE: You should call the getPaymentRequest API if you do not receive any payment status notification after 60 seconds.
Webhook payload
When a payment occurs, PayMe issues an HTTP POST notification message at the notification URL that you defined in the payment request API body. To ensure that only PayMe post messages on the URL, the messages will be signed. HTTP headers for webhook notification contain the PayMe-generated information that you can use to validate the signature.
If your webhook endpoint is unavailable or takes too long to respond, PayMe will re-attempt to send the notification message 5 times until a successful response (HTTP code: 200) is received.
HTTP headers
All payload requests have the following HTTP headers:
ATTRIBUTES
Content-Type string
Content-Type header defines the format of the body. The only acceptable value is application/json.
Digest string
The Digest header is a calculated value based on a hash and encoding of the message body. The steps to calculate the digest are as follows:
`Digest: Base64Encode(SHA-256(byte[] messageBody))`
`Digest: SHA-256=X48E9qOokqqrvdts8nOJRJN3OWDUoyWxBf7kbu9DBPE=`
Signature string
The Signature header is a calculated list of value as defined by the Signing HTTP Messages standard.
The format is as follows:
keyId="93993aec-863c-42a1-86dd-6649051ed87d",algorithm="hmac-sha256",headers="digest x-client-id x-event-type (request-target)",signature="/9dmB1UZcz9VivQ+XjSMDM6OGdx7Lu7f+qUcrSn/baY="
Use the "Signing key" to validate the PayMe signature sent in this parameter.
For details on validating the signature, click here.
x-event-type string
Event-Type will define the payment event. Possible values are the combination of Event Name and Event Type: payment.success and payment.failure.
x-client-Id string
This contains the client ID to whom the notification is sent.
Format: uuid
Pattern: '([a-fA-F0-9]{8}-(?:[a-fA-F0-9]{4}-){3}[a-fA-F0-9]{12}){1}'
Payment notifications You can create webhooks for the following notifications that occur in a payment.
Success
ATTRIBUTES
totalAmount number
Gross amount of the transaction, inclusive of fees.
currencyCode string
Currency code in which the payment was made
paymentRequestId string
Payment request ID of the transaction.
paymentRequestType string
Payment request type can be Static or Dynamic.
createdTime string
Date the QR code was created.
statusCode string
Payment request status codes: PR001, PR005, PR007, PR004
statusDescription string
Description of the payment request status codes:
PR001: Request for Payment Initiated
PR004: Request for Payment Rejected
PR005: Payment Success
PR007: Payment Request Expired
effectiveDuration string
Expiry date of the QR Code.
feeAmount number
Amount of fee collected for the payment transaction.
transactionId string
ID number for the transaction.
transactionSource string
Source of the transaction, for example, online, POS, etc.
transactionSourceDescription string
Description of the transaction source.
orderId string
ID of the merchant order.
orderDescription string
Description of the merchant order.
transactionType string
Type of transaction: 003.
transactionTypeDescription string
Description for transaction type 003: collect payment
transactionTime string
Timestamp of the order ID.
appSuccessCallback string
This field is used to set the callback URL on payment success.
appFailCallback string
This field is used to set the callback URL on payment failure.
{
Failure
ATTRIBUTES
totalAmount number
Gross amount of the transaction, inclusive of fees.
currencyCode string
Currency code in which the payment was made
paymentRequestId string
Payment request ID of the transaction.
paymentRequestType string
Payment request type can be Static or Dynamic.
createdTime string
Date the QR code was created.
statusCode string
Payment request status codes: PR001, PR005, PR007, PR004
statusDescription string
Description of the payment request status codes:
PR001: Request for Payment Initiated
PR004: Request for Payment Rejected
PR005: Payment Success
PR007: Payment Request Expired
effectiveDuration string
Expiry date of the QR Code.
reasonCode number
Reason code for failure.
reasonDescription string
Description of reason code.
appSuccessCallback string
This field is used to set the callback URL on payment success.
appFailCallback string
This field is used to set the callback URL on payment failure.
orderId string
ID of the merchant order.
{
Failure reason codes The following table shows the reason codes for payment failure, the description for the reason codes and the recommended error messages to display to your customers:
Reason Code
Reason Code Description
Customer error message
EW001 - EW008, EW012
PayMe unable to process payment
Payment failed. Please contact customer support for diagnosis and further steps.
EW2001
PayCode is expired.
Sorry, we were unable to confirm your payment status. Please contact the store to manually confirm the status of your order.
EW2005
Business Annual Transaction limit is reached.
Payment failed. Please contact customer support for diagnosis and further steps.
EW2017
Payment failed.
Payment failed. Please contact customer support for diagnosis and further steps.
EW2035
Unable to process payment.
Payment failed. Please contact customer support for diagnosis and further steps.
EW2036
PayMe user Annual Pay limit is reached.
Payment failed. Please contact customer support for diagnosis and further steps.
EW2037
Merchant's wallet balance limit exceeded.
Payment failed. Please contact customer support for diagnosis and further steps.
EW2038
PayMe user Daily Pay limit is reached.
Payment failed. Please contact customer support for diagnosis and further steps.
EW2039
PayMe user Monthly Pay limit is reached.
Payment failed. Please contact customer support for diagnosis and further steps.
Check Payment Request Status
After submitting a POST Payment request, you can undertake a GET operation using the paymentRequestId provided in the POST response as part of the path parameter. When the status of the payment request changes from 'Active' then a webhook notification will be sent to the notificationUri mentioned by you while creating the payment request. If no notification message is received within 60sec then we recommend polling this API for the status update. Its recommended to poll no more than once every 10 seconds.
In version 0.12 this API has been enhanced further. If the payment has been made successfully, i.e. payment state is Completed then details about the transaction will also be added in the response. If payment is not made against the payment request, i.e. payment state is Active , Expired or Aborted then no transaction details will be provided.
NOTE: Only payment transactions will be shown. i.e. if a payment transaction has been refunded, the details of this refund will not be provided. For this, the Get Transaction Details By ID API should be used.
Calling the endpoint
The payment API docs can be found here.
Please note that as per the Internet Engineering Task Force (IETF) - RFC 9110 Internet Standard should not send content in a GET request, as this could be rejected due to security concerns. While we usually use POST and PUT methods to send content to the server, GET methods are used to request information from the server in which content should not be present.
Use the postman collection to test retrieving the details of a payment request.
Transaction List0.11
Transaction allows the merchant to view transactions history.
Transactions can be searched by from and to dates, and requests can be limited to maximum 30 records. Paging can be used to view more records.
Paging is done by using "startingAfter", with the value being a transaction id. The response will return number of transactions after that transaction id.
The full response schema can be view at the API docs.
NOTE: A zero amount bank transfer transaction will be returned in Transaction List if the calculated fund out amount is zero during the execution of the auto fund out instruction.
Calling the endpoint
The payment API docs can be found here.
Please note that as per the Internet Engineering Task Force (IETF) - RFC 9110 Internet Standard should not send content in a GET request, as this could be rejected due to security concerns. While we usually use POST and PUT methods to send content to the server, GET methods are used to request information from the server in which content should not be present.
Use the postman collection to test the list of transactions.
Get Transaction Details By Id0.12
This API will enable you to get the details of transaction from the transaction Id. This API will also return the associated refund transactions.
It is only possible for a payment request to have one associated payment transaction. These transactions will have the transactionType=003 and transactionTypeDescription=Collect payment. However, for each payment request there can be multiple refund transactions. These transactions will have the transactionType=004 and transactionTypeDescription=Refund.
NOTE: The transaction list will be sorted by transaction date time.
Calling the endpoint
The payment API docs can be found here.
Please note that as per the Internet Engineering Task Force (IETF) - RFC 9110 Internet Standard should not send content in a GET request, as this could be rejected due to security concerns. While we usually use POST and PUT methods to send content to the server, GET methods are used to request information from the server in which content should not be present.
Use the postman collection to test get transaction details by id.
Refund0.11
The Refund capability enables you to execute real-time refunds, full or partial, on the transactions of your customers.
Step 1 - Transaction ID
To execute a refund, you need to provide us the transaction ID of the transaction you wish to refund.
There are 3 ways to obtain a transaction ID;
1. Webhook Response - After submitting a POST payment request, if the payment is made by a consumer, you will receive a success webhook notification (sent to the URI you specified in your request). This notification will include the transaction ID (transactionId). You should retain this ID to use for refunds.
Note, utilising the webhook is the recommended approach. If for whatever reason you failed to retain the transaction ID when you receive a webhook notification, you can check the status of a payment request or retrieve the transaction list to help you find the relevant transaction ID so you can process a refund.
You can find more details on the webhook responses here.
2. Check Status - After submitting a POST payment request - you can use the GET payment request to check the status of the payment request. If a payment request is paid by a consumer, the status of the payment request is 'completed' and the associated transaction ID is returned in the response.
You can find more details on Check Status here.
3. Transaction List - Using GET transactions you can retrieve a list of transactions including payments and refunds for a specified date range. The transactions completed during the date range you specify in the request are returned with their associated transaction IDs as part of the response.
You can find more details on GET transactions here.
Step 2 - POST refund
The transaction ID is a request parameter in the POST refund.
You must specify the amount and the reason for the refund.
You can make full or partial refunds, there is no limit to the number of partial refunds you can execute. However, the refund amount cannot be greater than the remaining transaction amount (i.e. original transaction amount less any previous refund amounts).
Step 3 - credit refund amount to customer PayMe wallet
The receiving customers wallet will be immediately credited the full refund amount and your wallet will be debited the net amount (full refund amount less relevant fee amount). The fee amount will be returned to customer by PayMe.
Refund example,
Payment
a. Consumer purchases item form your online store for HK$100, pays with PayMe.
b. HK$100 is deducted from the consumers PayMe wallet.
c. HK$98.50 is credited to your PayMe wallet (assumes 1.5% txn fee amount i.e. only net amount credited to your wallet).
Refund
a. Consumer requests full refund i.e. HK$100.
b. You use POST refund for HK$100.
Note, you state the full amount you wish to refund the customer.
c. Your PayMe wallet is deducted HK$98.5
d. PayMe contributes HK$1.50 (the amount previously deducted in fees).
e. The consumers wallet is credited HK$100 (full amount).
Note: we have a rate limit rule on refunds to prevent unintended repeat refund requests. The rule rejects a refund request from a merchant if they have made a request within the past 5 seconds with the same transaction id and transaction amount. The merchant will receive the following error "EB099 (Internal Server Error, contact support)". If this is a genuine refund request and not an accidental duplicate, the merchant should retry the request after the 5 second period elapses.
Calling the endpoint
The payment API docs can be found here.
Use the postman collection to test refunds.
Errors and troubleshooting
Errors will be returned to the caller in the following format:
Error pattern to consumers
Parameters
Type
Description
message
String
High level error description.
errors
Array
Array containing the error responses.
errorCode
String
Code of the error.
errorDescription
String
Error description associated with the error.
Sample error message when error occurs:
HTTP code: 401 - Unauthorized
{
  "message": "API Gateway Authentication Failed",

  "errors": [

    {

      "errorCode": "EA001",

      "errorDescription": "Error validating JWT"

    }

  ]

}
The following list of generic error codes may be encountered while using the PayMe APIs.
Error Code
Error title
HTTP code
Notes
EA000
Unexpected API Gateway Exception
500
The API gateway experienced an unexpected error, please contact support
EA001
Server request authentication failed
401
The API backend has rejected your request due to an authentication issue
EA001
API gateway authentication failed
401
The API gateway has rejected your request due to an authentication issue
EA002
Server request validation failed
400
The API backend has rejected the request because it does not match the expected format as expressed by the specification. e.g. missing headers, incorrect values formats or body format.
EA002
API gateway validation failed
400
The API backend has rejected the request because it does not match the expected format as expressed by the specification. e.g. missing headers, incorrect values formats or body format.
EA003
Service request execution failed
500
The API backend experienced an un expected error, please contact support
NA
Service request time out
504
The API did not respond in time and the request was cancelled
EA008
Request header not acceptable
406
Missing or incorrect Accept header in the request
EA009
Too many service requests made
429
Rate limit of APIM exceeded, check each request has a unique Trace-Id header value, contact support of this doesn't resolve your issue
EA014
Service Request Validation Failed
400
Request to create a payment request uses an invalid currency code, must be "HKD"
EA015
Invalid effective duration
400
'paymentRequestInputModel': field 'effectiveDuration' must be greater than or equal to 15; rejected value
EA017
Service Request Validation Failed
400
Request to create a payment request uses an invalid total amount, check api documentation for limits
EA018
Content-Type unsupported
415
Missing or incorrect Content-Type header in the request with content
EA019
Service Request Validation Failed
400
Invalid RFC3339 date format
EA020
Service Request Validation Failed
400
(from) is after (to)
EB003
Service Request Validation Failed
400
Account related, contact support
EB004, EB005, EB006
Service Request Validation Failed
500
Internal server error, contact support
EB007
Expired pay code
400
The API backend has rejected your request as QR code has expired
EB008
Service Request Validation Failed
400
PayCode not found
EB009
Transaction not found
400
No data exists for the transaction ID provided
EB010
Service Request Validation Failed
400
Refund amount entered > net refundable amount
EB011
Service Request Validation Failed
400
Refund amount entered > wallet balance
EB012
Service Request Validation Failed
400
Blocked by business rules.
EB013
Service Request Validation Failed
400
Blocked by business rules.
EB020
QR code is in Aborted state
400
The API backend has rejected your request as QR code is in aborted state
EB021
QR code is in Completed state
400
The API backend has rejected your request as transaction is already completed
EB022
QR code payment is currently being processed
400
The API backend has rejected your request as the QR code payment is currently being processed.
If you encounter API errors and are unsure of how to solve them, please contact your integration manager, and provide all the details of your request.
© PayMe from HSBC | Terms & Conditions | Website Terms of Use | Privacy and Security